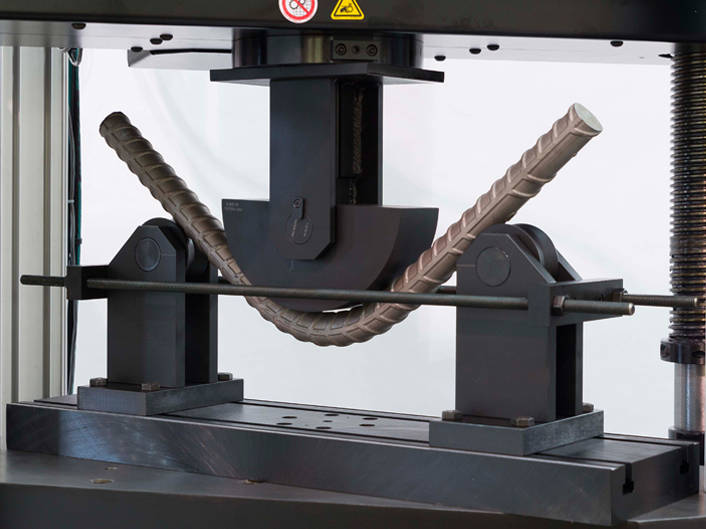
The cold bend fixture consists of a base with two infinitely adjustable supports and a plunger (loading strut). Different size bending pins can be ordered to mount on the loading strut to change the radius of the bend. The fixture is designed to bend steel into a "U" shape bend. The finished bend can be near (but never more than) 180 degrees.
Conforms to ASTM A615, A706, A966A and BS4449. The heavy duty base with adjustable span is designed to perform a nominal 90 / 180 degree bend test on # 3 through # 18 (M8-M50) reinforcement bar (rebar), when used with the appropriate bending pins.
Principle of Operation
The loading strut is mounted in the compression space of a testing machine. The fixture base rests on the machine table and is aligned with the loading strut using a centering pin.
The supports are adjustable to any desired span using a scale that has an origin at the center of the base. Both English and Metric scales are located on the base. The supports clamp to the base by T-slots and use threaded rods to resist deflection during loading. The base is designed to be supported by the machine table or base and can only achieve full capacity when supported with an overhang of 64 mm (2.5 in) or less on each side.
Application Range
- Type of Loading: compression cold bend
- Specimen Material: steel
- Specimen Types: round, rebar
W-6812 | Cold Bend Testing Fixture for Steel Reinforcement Bar
Cold Bend Testing Fixture for bend testing of steel reinforcement bars in general accordance with Specifications; ASTM A615, A706, A996A, & BS4449
A heavy duty table mounted base fixture with an adjustable span is designed for performing the nominal 90 / 180 degree bend tests on #3 through #18 (M8-M50) rebar, when used with the appropriate loading pins. A loading strut, capable of accepting various diameter bending pins, is provided and must be adapted to the adjustable crosshead.
Specifications:
- Rated for 200kN (45,000 lbf) capacity when installed fully supported.
- If installed with overhang, capacity is rated per below:
Capacity (kN) = 12,600/x when x > 64 mm
Capacity (lbf) = 111,900/x when x > 2.5 in
- Power Stroke Needed - test stoke requirements will vary based on degree of bend and diameters being tested, see pin sets for information regarding test stroke required.
- Maximum Support Span (between inside of rollers): 480 mm (19.0 in)
- Minimum Support Span (between inside of rollers): 0 mm (0 in)
- Support Plunge Height: 206 mm (8.125 in)
- Max Specimen Diameter: 76 mm (3 in)
- Loading Nose Height (to pin center): 165 mm (6.50 in)
- Upper Attachment: Type R1 (1.0 in holding button)
- Lower Attachment: Centering Pin (1/2 in set screw)
- Tool kit included: 19 mm Combination wrench
- Loading Nose assembly includes a 33.4mm (1.313 in) diameter pin which serves as a centering pin for most other larger bending pins.
(Pin sets based on specification standards and specimen sizes offered separately)
Combined Weight (without bending pins): 83 kg (183 lbs)
