Traceability: What is it, and Why is it Important in Testing of Materials?
One link/tier further down this chain is Instron’s 130,000lb deadweight stack Primary Force Standard. Since this stack of deadweight has been calibrated with traceability reaching all the way back to the IPK, we can say how accurate our deadweight is in comparison to the actual kilogram! Our stack can then be used to calibrate our Working Force Standard reference load cells (skipping the Secondary Standard link/tier in the chain) with much less accumulated uncertainty, resulting in superior comparative measurements (calibrations) on our customers' systems.
Without this chain of traceability, there would be no quantitative means to assess how accurate our customers' systems performance is during E4 Tier calibration. More importantly, the same goes for how truly meaningful the material test measurements are (such as the pull/yield strength tests described at the beginning of this blog post) in regard to the uncertainty associated with those pass/fail results.
What Questions Should You Be Asking Your Calibration Provider?
Calibration laboratory accrediting bodies, including NVLAP and A2LA, ensure traceability of measurement and the metrological soundness of calibration processes and procedures. If a measurement is not accredited, a service provider must prove traceability back to the first accredited calibration in the chain.
- Does my calibration agency provide an accredited calibration?
- If not, can they prove traceability back to the SI?
- Does my calibration agency have in-house primary or secondary standards?
- How large is the uncertainty of the calibration accomplished on my machine?
- If I add the uncertainty to the error from my machine's calibration, how far off could my machine's FMS potentially be?
- What potential risk does this uncertainty create in the pass or fail status of the material test results obtained with my machine?
A metal bar is placed in a materials testing machine, pulled from both ends and yields when the machine reads 10,000 Newtons. You trust that measurement because your machine has been calibrated, you have a certificate for that calibration and on that certificate is a statement closely resembling the following:
“The measurement results are traceable to the SI (The International System of Units) through internationally recognized National Metrology Institutes (NIST, NPL, PTB, etc.)”
What is Traceability?
Let’s begin with a definition from The International Vocabulary of Metrology (VIM): Metrological Traceability is the property of a measurement result whereby the result can be related to a reference through a documented unbroken chain of calibrations, each contributing to the measurement uncertainty.
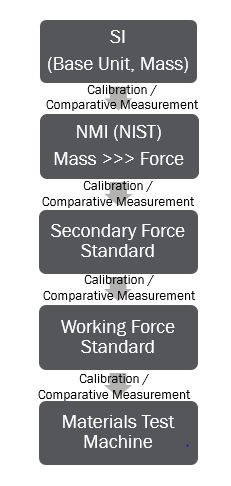
From this definition we begin to build a foundation of what traceability means in the context of calibration. When a measurement is traceable to the SI, the reference device used has itself been calibrated by a superior reference device. This calibration is a single link in our chain of traceability. In order for a measurement to be traceable, these links (calibrations) form an unbroken chain all the way back to the base unit of measure, also known as the SI! Take a look at the traceability chain below:

This chain allows traceable force measurements to be made beginning with an ASTM E74 “Secondary Force Standard”. A secondary standard is typically a device that has been calibrated by a National Metrology Institute such as NIST.
That standard is then used to calibrate the Working Force Standard reference (a second tier E74 device) which is subsequently used to calibrate a material test machine’s Force Measurement System (FMS).
As you can see, the full and completed chain can become quite long before it finally reaches a FMS in a Materials Test Machine (ASTM E4 tier). The longer this chain is, the more uncertainty is included in each of the successive calibration results and ultimately in your machines’ measurement results.
A Primary Force Laboratory such as Instron employs in house standards, similar to NIST’s, using Masses that are themselves traceable to the SI. This shortens the chain and significantly reduces the total accumulated uncertainty of the comparative measurement results made during a machines’ FMS calibration and the materials test results it produces.
Why is Traceability Important?
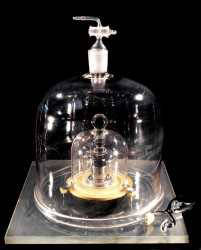
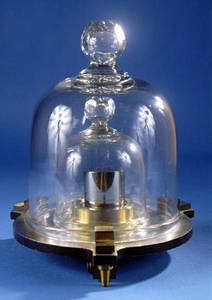
The International System of Units (SI) defines seven units of measure as a basic set from which all other SI units are derived. One familiar unit, the kilogram, is the base unit for the physical quantity mass. The kilogram is defined as being equal to the mass of the International Prototype of the Kilogram or IPK as it is commonly referred to. IPK, seen below, is in fact a cylinder composed of platinum and iridium. Seen next to IPK is K20. K20 resides in Maryland at NIST and has been traceably calibrated against IPK. Thus, we begin our chain of traceability!
The International System of Units (SI) defines seven units of measure as a basic set from which all other SI units are derived. One familiar unit, the kilogram, is the base unit for the physical quantity mass. The kilogram is defined as being equal to the mass of the International Prototype of the Kilogram or IPK as it is commonly referred to. IPK, seen below, is in fact a cylinder composed of platinum and iridium. Seen next to IPK is K20. K20 resides in Maryland at NIST and has been traceably calibrated against IPK. Thus, we begin our chain of traceability!

International Prototype Kilogram (IPK)
BIPM (France)

K20
NIST (Maryland, US)
Originally posted on February 12, 2017 , Updated On June 27, 2024